Game Streaming & Video Streaming

视频传输编码

在初步接触了视频传输编码之后,我开始好奇Streaming采用的哪种视频编码呢?

详见 Streaming Protocol一文

Moonlight for IPAD

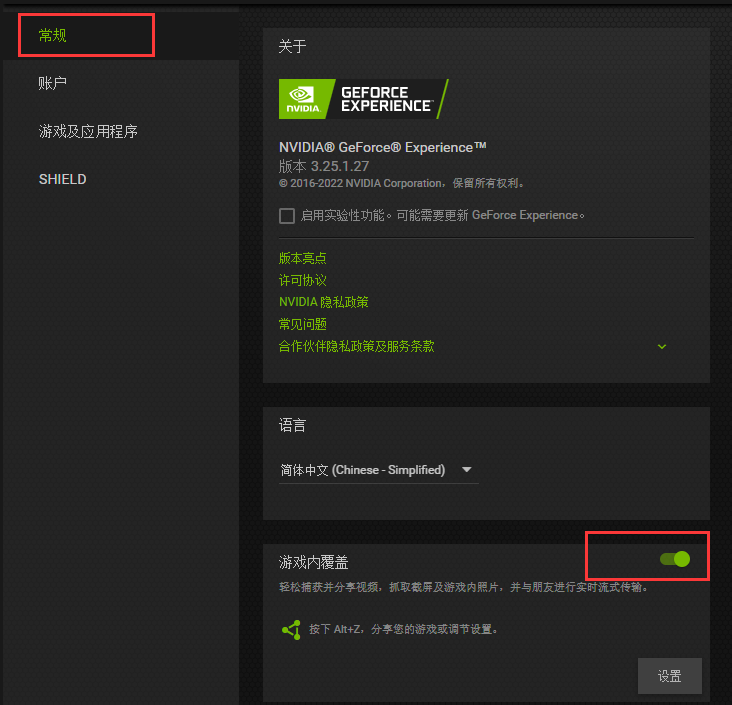
Nvidia Geforece界面

  1. 常规中开启分享
  2. SHEILD 开启
    1. 添加,按照C:\Windows\System32\mstsc.exe这个地址,将mstsc.exe添加进去,mstsc.exe就是你的桌面,等会串流,可以用手机直接操控你的电脑桌面。

串流画面问题

moonlight找不到电脑

https://www.bilibili.com/read/cv10239020

1
2
netsh advfirewall firewall add rule name="GameStream UDP" dir=in protocol=udp localport=5353,47995,47998-48010 action=allow
netsh advfirewall firewall add rule name="GameStream TCP" dir=in protocol=tcp localport=47984,47989,47995,48010 action=allow


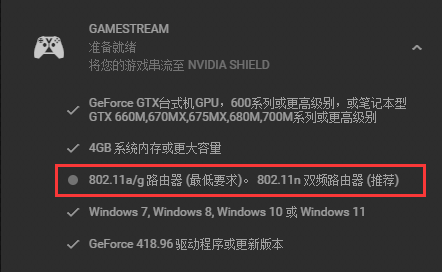
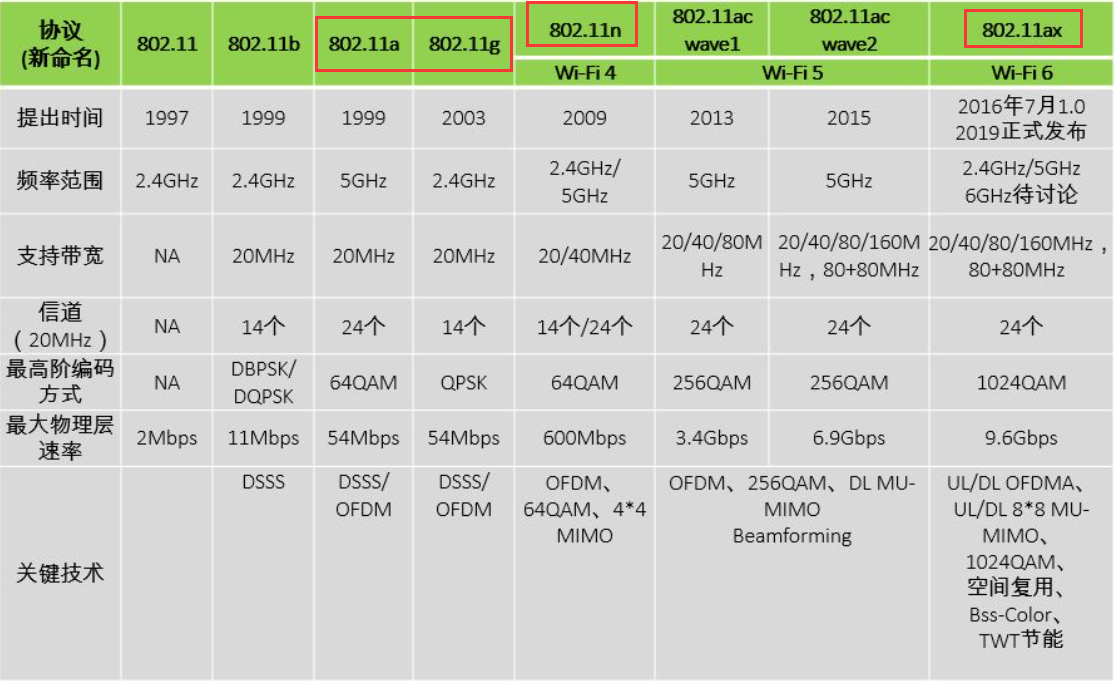
还是不行,猜测是

但是这个是wifi6 11ax

尝试安装Internet-Hosting-Tool,运行有提示失败,建议重装也不行。

sjf的解决办法

  1. 卸载当前版本,然后安装3.19
  2. 打开服务
    1. 找到属性 单击打开。找到登录 复选框 把里面的登录身份选择成 本地系统账户 运行服务与桌面交换。勾选然后应用
    2. moonlight可以搜索到电脑
    3. https://pan.baidu.com/s/1x83Uk4kkYQritiNAqg_vLg [/url]提取码:1111 获得NvContainerNetworkService服务注册表文件
  3. 官网下载更新GF到最新

实际解决

  1. 官网下载更新GF到最新
  2. 通过上面的注册表添加NvContainerNetworkService服务,启动
    1. 任务计划程序里设置, 设置开机启动moonlightNVNetStart任务
    2. 程序"C:\Program Files\NVIDIA Corporation\NvContainer\nvcontainer.exe"
    3. 参数-s NvContainerNetworkService -f "C:\ProgramData\NVIDIA\NvContainerNetworkService.log" -l 3 -d "C:\Program Files\NVIDIA Corporation\NvContainer\plugins\NetworkService" -r -p 30000 -st "C:\Program Files\NVIDIA Corporation\NvContainer\NvContainerTelemetryApi.dll"
  3. 成功
  4. 修改分辨率为ipad分辨率,全屏应用
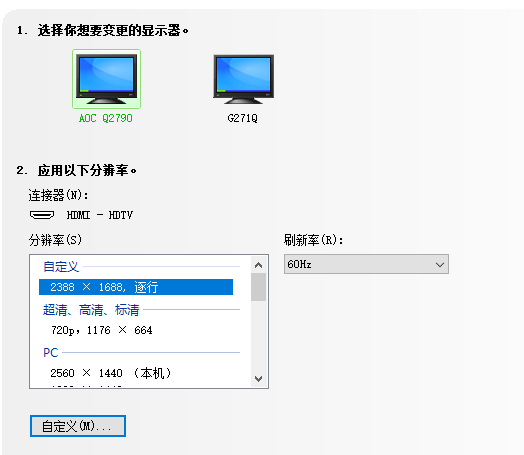
  5. 修改英伟达控制面板的分辨率为IPAD 2388*1688 macbook 2560*1600

问题:Nvidia控制面板没有显示一项

  • 如果显卡驱动装好,且显卡都开了,但就是没有显示选项。
  • 打开服务,找到NVDisplay.ContainerLocalSystem,点登录项,将“允许服务与桌面交互(W)”前的勾打上,重启NVDisplay.ContainerLocalSystem服务,
  • 返回桌面,右键-显示设置,将分辩率任意改一个可用的-应用,
  • 桌面右键-N..控制面板,就有了显示选项,可以改2K分辩率啦。

IPAD moonlight 串流控制

type ESC and mouse scroll

对于实体键盘可以修改映射, 但是滚轮就不好用了。

与其这样不如换个思路,添加手柄,看其能不能支持滚轮和ESC。初步尝试,滚轮可以只是灵敏度有点低。AntiMicroX完美解决了这个问题,配置文件路径 I:\BT\GAME\x18Game\moonlightAntiMicroX.gamecontroller.amgp

体验十分丝滑,任意程序也可以添加。支持PS4手柄(长按PS和share键配对)

share时一定要登录steam

任意应用全屏

应用串流至少将某应用窗口转发,所以只需要停止流式传输,然后调整分辨率就行了。

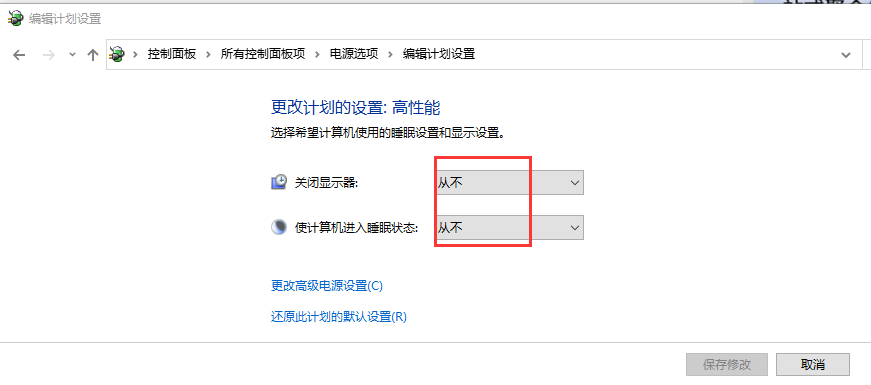
晚上关闭屏幕,不休眠

  1. 方法一:管理员运行代码 @powercfg -h off

云原神测试

高画质60帧 1.6MB/s

最低画质30帧 500KB/s

需要进一步的研究学习

暂无

遇到的问题

暂无

开题缘由、总结、反思、吐槽~~

参考文献

Crawler

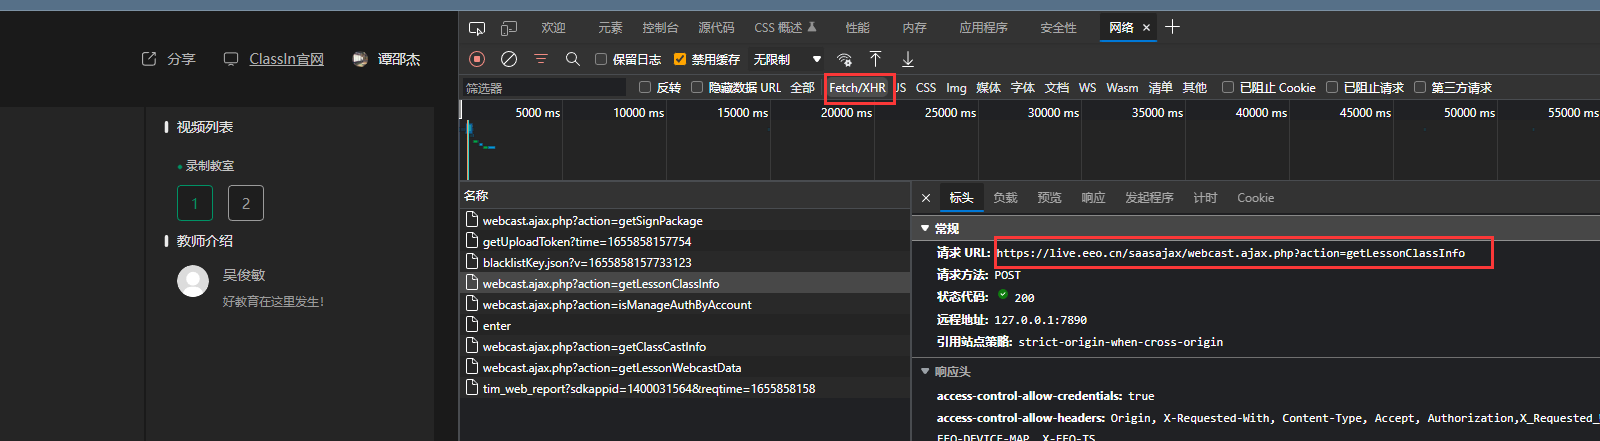
如何获取请求链接

这个api是怎么来的呢?
lesson_info_url = "https://www.eeo.cn/saasajax/webcast.ajax.php?action=getLessonLiveInfo"

感谢大佬回答

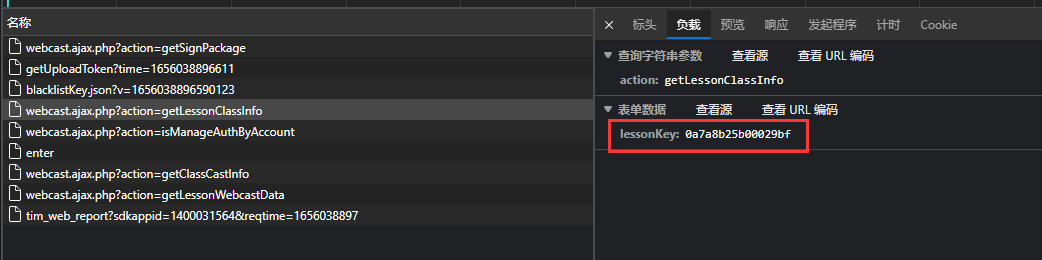
输入

返回数据

PHP源文件

PHP是后端语言,前端是无法查看的,前端看到的是最终运算之后的结果,PHP源代码是无法查看的。

使用

header改一下就能用了,注意不要开代理

1
2
3
4
5
6
7
8
9
10
11
12
13
14
15
16
17
18
from requests import Session

session = Session()
lesson_info_url = "https://www.eeo.cn/saasajax/webcast.ajax.php?action=getLessonLiveInfo"

headers = {
'Accept': 'text/html,application/xhtml+xml,application/xml;q=0.9,*/*;q=0.8',
'Accept-Language': 'zh-CN,zh;q=0.9,zh-TW;q=0.8,en;q=0.7',
'User-Agent': 'Mozilla/5.0 (Windows NT 10.0; Win64; x64) AppleWebKit/537.36 (KHTML, like Gecko) Chrome/80.0.3987.149 Safari/537.36'
}

data = {
'lessonKey': lessonKey
}

resp = session.post(url=lesson_info_url, headers=headers, data=data)
text = resp.json()
CourseName = text['data']['courseName']

urllib.request下载视频

1
2
3
4
5
6
7
8
9
10
11
12
13
14
15
16
17
from urllib import request

base_url = 'https://f.us.sinaimg.cn/001KhC86lx07laEy0PtC01040200y8vC0k010.mp4?label=mp4_hd&template=640x360.28&Expires=1528689591&ssig=qhWun5Mago&KID=unistore,video'
#下载进度函数
def report(a,b,c):
'''
a:已经下载的数据块
b:数据块的大小
c:远程文件的大小
'''
per = 100.0 * a * b / c
if per > 100:
per = 100
if per % 1 == 1:
print ('%.2f%%' % per)
#使用下载函数下载视频并调用进度函数输出下载进度
request.urlretrieve(url=base_url,filename='weibo/1.mp4',reporthook=report,data=None)

例子一

小白尝试 学校的资源网址(http://wlkt.ustc.edu.cn/)

爬取List读取

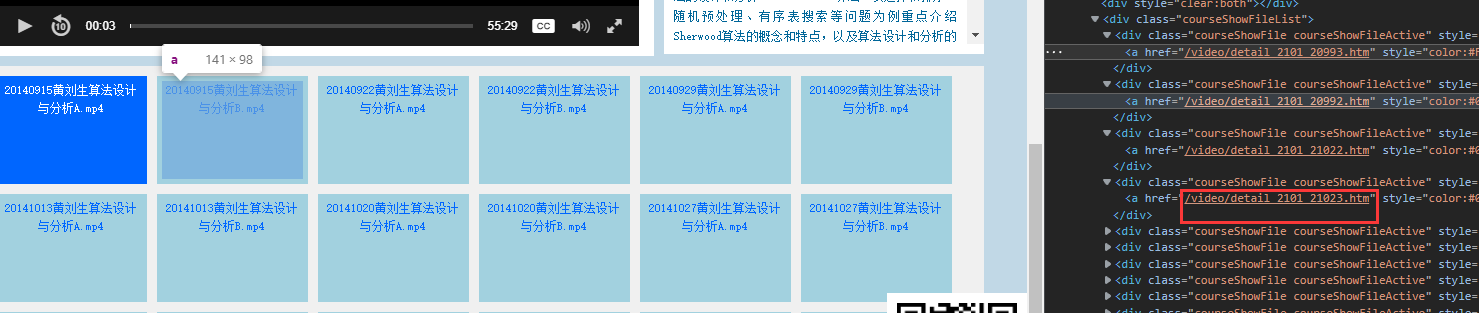
正则匹配video/detail出视频网址后缀

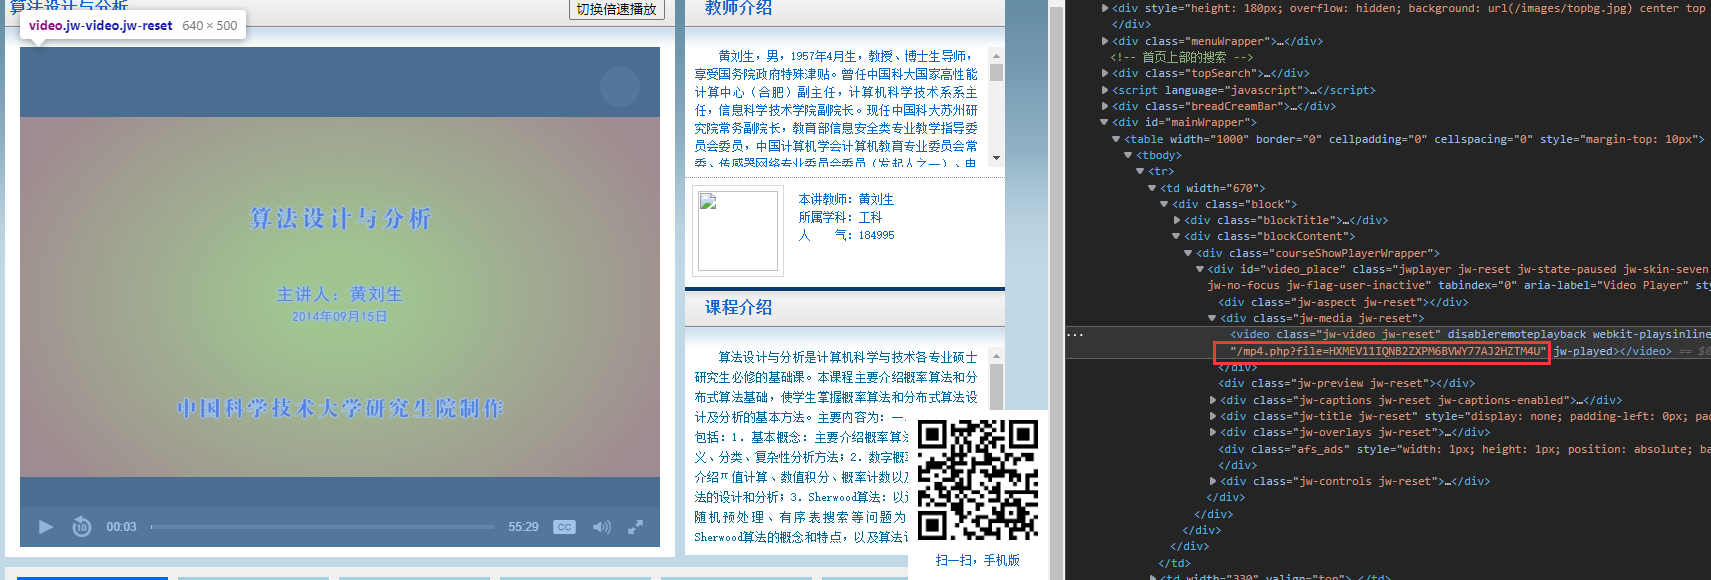
网页视频位置

正则匹配mp4.php得到视频位置http://wlkt.ustc.edu.cn/mp4.php?file=HXMEV11IQNB2ZXPM6BVWY77AJ2HZTM4U

但是不打开网站没有php返回,网页只能得到。

可通过下面API返回需要的, 可以见github代码

1
2
3
4
5
6
7
8
9
opener = urllib.request.FancyURLopener({})
f = opener.open(taskUrl)
content = f.read()

#1.得到beautifulsoup对象
soup = BeautifulSoup(content,'html.parser')

#通过指定的 属性获取对象
ic(soup.find(id=glv._get(taskType)["data1id"]).attrs['value'])#单个对象


data输入

返回数据

需要进一步的研究学习

暂无

遇到的问题

暂无

开题缘由、总结、反思、吐槽~~

科大BB clashIn 想爬录像。但是网上的两个都用不了了,想自学,改一下

https://github.com/aoxy/ClassIn-Video-Download

https://github.com/JiangGua/classin-downloader

参考文献

https://blog.csdn.net/qq_37275405/article/details/80780925

EpicUnrealEngine

我跪了,看来垃圾电脑玩不来,官方光明山脉demo要64GB内存和200GB储存。而且打开渲染超级慢

需要进一步的研究学习

暂无

遇到的问题

暂无

开题缘由、总结、反思、吐槽~~

  1. 想实现美少女跳舞
    1. 其实好像Unity 3D更简单

参考文献

Cuda Optimize : Stencil

课程报告PPT

有对应的PPT,代码。

最终将1000ms程序优化到1~2ms

乔良师兄有根据知乎介绍如何利用寄存器文件缓存

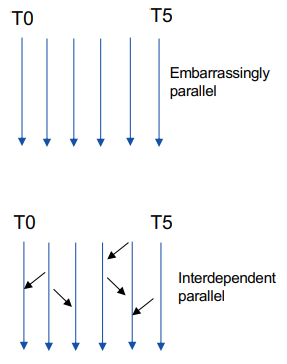
SMEM难点: 跨线程访存

  1. 不仅每个线程需要访问自己划分对应区域之外的元素
  2. 而且访问的总个数也不是线程数对应的倍数

导致Embarrassingly Parallel Problems

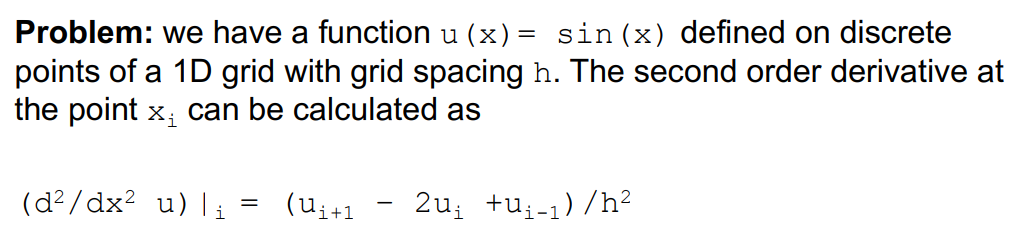
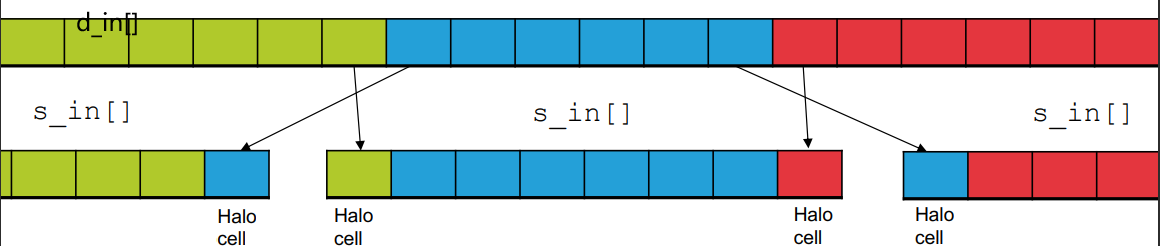
1D 梯度计算 Stencil实例

计算某点的梯度,需要前后的function值。

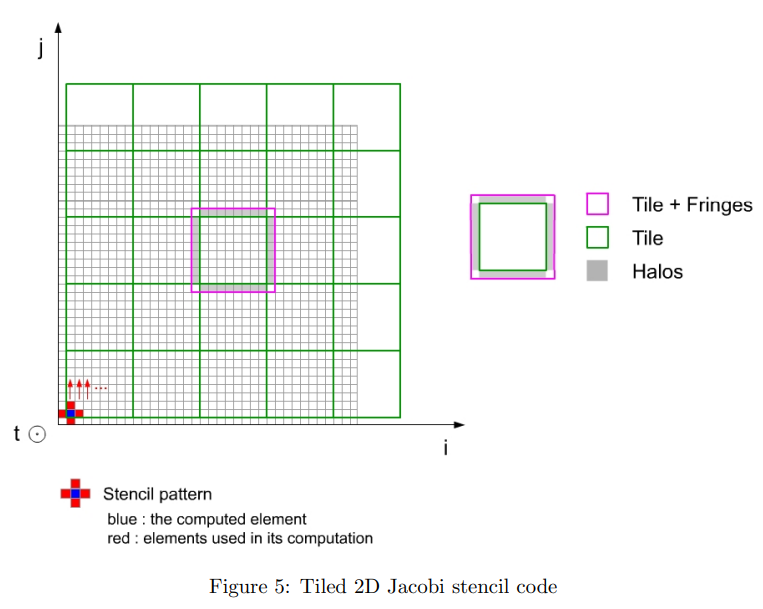
Halo/Ghost Cells 光晕

问题:
对于边界上的cells,需要访问相邻区域的元素。

解决办法:
将他们也加入进当前block的SMEM

Indexing with Halo Cells

  1. Stencil问题的半径 radius (RAD) 是边缘元素需要的某方向的额外元素
    1. 在梯度的例子里是1
  2. SMEM声明的大小,需要在每个维度上都增加 2*RAD的个数
  3. 这导致SMEM的index的每个维度需要增加RAD. s_idx = threadIdx.x + RAD;

code

1
2
3
4
5
6
7
8
9
10
11
12
13
int main() {
const float PI = 3.1415927;
const int N = 150;
const float h = 2 * PI / N;
float x[N] = { 0.0 };
float u[N] = { 0.0 };
float result_parallel[N] = { 0.0 };
for (int i = 0; i < N; ++i) {
x[i] = 2 * PI*i / N;
u[i] = sinf(x[i]);
}
ddParallel(result_parallel, u, N, h);
}

Kernel Launching

1
2
3
4
5
6
7
8
9
10
11
12
13
14
15
16
#define TPB 64
#define RAD 1 // radius of the stencil

void ddParallel(float *out, const float *in, int n, float h) {
float *d_in = 0, *d_out = 0;
cudaMalloc(&d_in, n * sizeof(float));
cudaMalloc(&d_out, n * sizeof(float));
cudaMemcpy(d_in, in, n * sizeof(float), cudaMemcpyHostToDevice);

// Set shared memory size in bytes
const size_t smemSize = (TPB + 2 * RAD) * sizeof(float);
ddKernel<<<(n + TPB - 1)/TPB, TPB, smemSize>>>(d_out, d_in, n, h);
cudaMemcpy(out, d_out, n * sizeof(float), cudaMemcpyDeviceToHost);
cudaFree(d_in);
cudaFree(d_out);
}

Kernel Definition

1
2
3
4
5
6
7
8
9
10
11
12
13
14
15
16
17
__global__ void ddKernel(float *d_out, const float *d_in, int size, float h) {
const int i = threadIdx.x + blockDim.x * blockIdx.x;
if (i >= size) return;

const int s_idx = threadIdx.x + RAD;
extern __shared__ float s_in[];

// Regular cells
s_in[s_idx] = d_in[i];
// Halo cells
if (threadIdx.x < RAD) {
s_in[s_idx - RAD] = d_in[i - RAD];
s_in[s_idx + blockDim.x] = d_in[i + blockDim.x];
}
__syncthreads();
d_out[i] = (s_in[s_idx-1] - 2.f*s_in[s_idx] + s_in[s_idx+1])/(h*h);
}

需要进一步的研究学习

暂无

遇到的问题

暂无

开题缘由、总结、反思、吐槽~~

研一下USTC并行计算自己的选题

参考文献

https://dumas.ccsd.cnrs.fr/dumas-00636254/document

https://indico.fysik.su.se/event/6743/contributions/10338/attachments/4175/4801/4.CUDA-StencilsSharedMemory-Markidis.pdf

Css & Scss

CSS (Cascading Style Sheets) 和 SCSS (Sassy CSS) 都是用于样式表的编程语言,用于定义网页的外观和布局。

Read more

Cuda Optimize

Outline

  1. General optimization guidance
    1. Coalescing memory operations
    2. Occupancy and latency hiding
    3. Using shared memory
  2. Example 1: transpose
    1. Coalescing and bank conflict avoidance
  3. Example 2: efficient parallel reductions
    1. Using peak performance metrics to guide optimization
    2. Avoiding SIMD divergence & bank conflicts
    3. Loop unrolling
    4. Using template parameters to write general-yet-optimized code
    5. Algorithmic strategy: Cost efficiency

CUDA 优化策略

基础

  1. 最大化并行独立性
  2. 最大化计算密度

减少数据传输

  1. 数据可以直接在GPU生成。
  2. 一次大传输也比分开的小批次快

zerocopy

如果我们数据只会在 GPU 产生和使用,我们不需要来回进行拷贝。

https://migocpp.wordpress.com/2018/06/08/cuda-memory-access-global-zero-copy-unified/

简而言之,在 host 使用命令:cudaHostRegisterMapped
之后用 cudaHostGetDevicePointer 进行映射
最后解除绑定 cudaHostUnregister

即,

1
2
3
4
5
6
7
8
9
10
11
12
13
14
15
16
// First, pin the memory (or cudaHostAlloc instead)
cudaHostRegister(h_a, …, cudaHostRegisterMapped);
cudaHostRegister(h_b, …, cudaHostRegisterMapped);
cudaHostRegister(h_c, …, cudaHostRegisterMapped);

cudaHostGetDevicePointer(&a, h_a, 0);
cudaHostGetDevicePointer(&b, h_b, 0);
cudaHostGetDevicePointer(&c, h_c, 0);

kernel<<<...>>>(a, b, c);
cudaDeviceSynchronize();

// unpin/release host memory
cudaHostUnregister(h_a);
cudaHostUnregister(h_b);
cudaHostUnregister(h_c);

cuda warp shuffle

只要两个thread在 同一个warp中,允许thread直接读其他thread的寄存器值,这种比通过shared Memory进行thread间的通讯效果更好,latency更低,同时也不消耗额外的内存资源来执行数据交换。ref

访存连续性

  1. Optimize for spatial locality in cached texture memory ???
  2. 避免bank conflict: 如果没有bank冲突的话,共享内存的访存速度将会非常的快,大约比全局内存的访问延迟低100多倍,但是速度没有寄存器快。然而,如果在使用共享内存时发生了bank冲突的话,性能将会降低很多很多。

Global Memory:coalesced access

对齐(Starting address for a region must be a multiple of region size)集体访问,有数量级的差异Coalesced

利用好每个block里的thread,全部每个线程各自读取自己对齐(Starting address for a region must be a multiple of region size 不一定是自己用的)数据到shared memory开辟的总空间。由于需要的数据全部合力读取进来了,计算时正常使用需要的读入的数据。

特别是对于结构体使用SoA(structure of arrays)而不是AoS(array of structures),
如果结构体实在不能对齐, 可以使用 __align(X), where X = 4, 8, or 16.强制对齐。

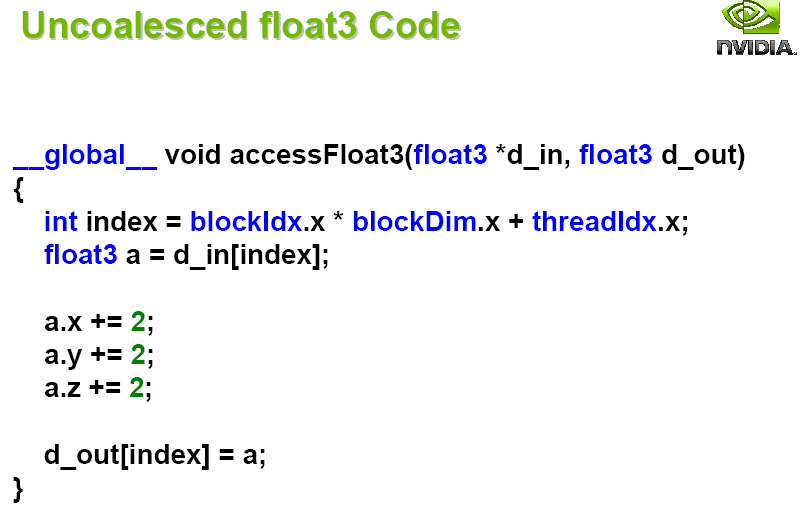
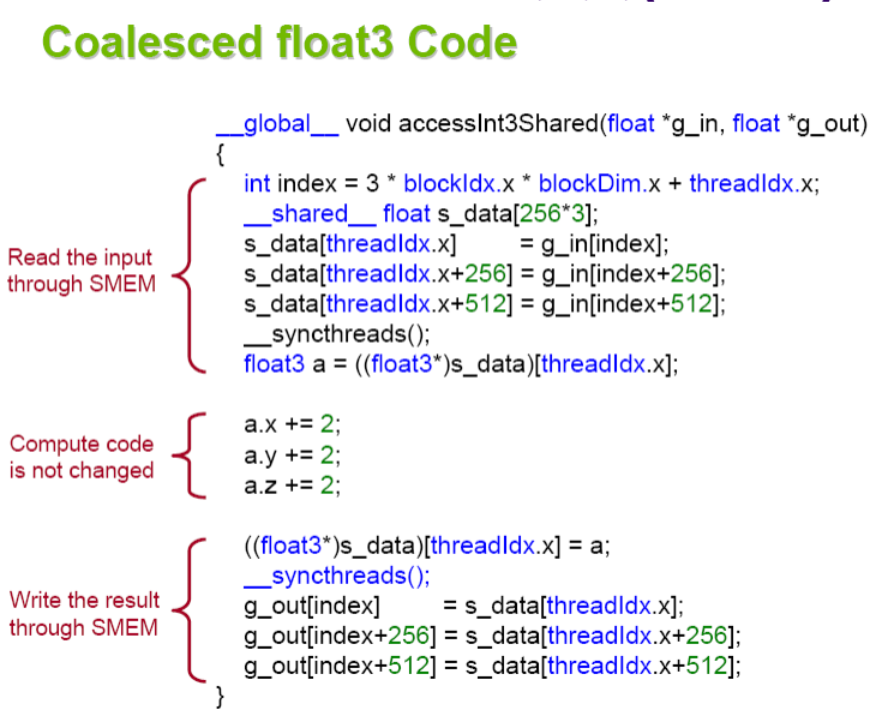
对齐读取 float3 code

对于small Kernel和访存瓶颈的Kernel影响很大

由于需要对齐读取,3float是12字节,所以只能拆成三份。

有无采用对齐shared读取,有10倍的加速。

利用好Shared Memory

  1. 比globalMemory快百倍
  2. 可以来避免 non-Coalesced access
  3. SM的线程可以共享
  4. Use one / a few threads to load / compute data shared by all threads

隐藏延迟的方法

  1. 增加SM上线程数量,
  2. block数> SM数,这样所有的multiprocessors至少有一个block执行
  3. threads/block>128 。原因:机器上一般有最多4个Warp调度器=4*32=128
  4. threadsInblock=N*WarpSize=N*32
  5. 在 SM 上的 TB 越多越好,让 Thread Block 不停的跑我们的利用率就会高。
  6. 但是如果 Thread Block 太多,我们每一个 SM 能分配的寄存器就会变少,所以就会发生 Register Spill, 使用更高级的 L1、L2 Cache 去代替 Registers。所以 TB 不能太多,需要减少 Register Spill 的次数。
    1. 资源占用率不要太高(最多一半?
  7. 多使用 __syncthreads
  8. 最好的参数需要self-tuning出来

占用率高不一定是好事

占用率是指每个多处理器(Streaming Multiprocessor,SM)的实际的活动warps数量与最大理论的warps数量的比率。
高的占用率不一定能提升性能,因为这一般意味着每个线程分配的寄存器和shared memory变少。但低的占用率会导致内存延迟无法隐藏。

实际需要计算每个线程大概需要的shared memory和register数量

实际例子测试-待研究

https://www.cnblogs.com/1024incn/p/4541313.html

https://www.cnblogs.com/1024incn/p/4545265.html

优化实例1 - 矩阵转置

通过SMEM实现coalescing access

原本代码

1
2
3
4
5
6
7
8
9
10
11
_global__ void transpose_naive(float *odata, float *idata, int width, int height)
{
unsigned int xIndex = blockDim.x * blockIdx.x + threadIdx.x;
unsigned int yIndex = blockDim.y * blockIdx.y + threadIdx.y;
if (xIndex < width && yIndex < height)
{
unsigned int index_in = xIndex + width * yIndex;
unsigned int index_out = yIndex + height * xIndex;
odata[index_out] = idata[index_in];
}
}

思想:将大矩阵划分成方块,并且存储在SMEM里。不仅SMEM速度更快,而且每行元素个数变少,跨行访问的间距变小,局部性增强。而且对于大矩阵加速效果会更明显。

1
2
3
4
5
6
7
8
9
10
11
12
13
14
15
16
17
18
19
20
__global__ void transpose(float *odata, float *idata, int width, int height)
{
__shared__ float block[BLOCK_DIM*BLOCK_DIM];
unsigned int xBlock = blockDim.x * blockIdx.x;
unsigned int yBlock = blockDim.y * blockIdx.y;
unsigned int xIndex = xBlock + threadIdx.x;
unsigned int yIndex = yBlock + threadIdx.y;
unsigned int index_out, index_transpose;
if (xIndex < width && yIndex < height)
{
unsigned int index_in = width * yIndex + xIndex;
unsigned int index_block = threadIdx.y * BLOCK_DIM + threadIdx.x;
block[index_block] = idata[index_in];
index_transpose = threadIdx.x * BLOCK_DIM + threadIdx.y;
index_out = height * (xBlock + threadIdx.y) + yBlock + threadIdx.x;
}
__syncthreads();
if (xIndex < width && yIndex < height)
odata[index_out] = block[index_transpose]
}

coalescing access

when Block/tile dimensions are multiples of 16 ???

关于bank conflict

https://developer.nvidia.com/blog/efficient-matrix-transpose-cuda-cc/

对于一个32 × 32个元素的共享内存块,一列数据中的所有元素都映射到相同的SMEM bank ,导致bank conflict 的最坏情况:读取一列数据会导致32路的存储库冲突。

幸运的是,只需要将tile的元素宽度改为33,而不是32就行。

优化实例2 - 数据归约

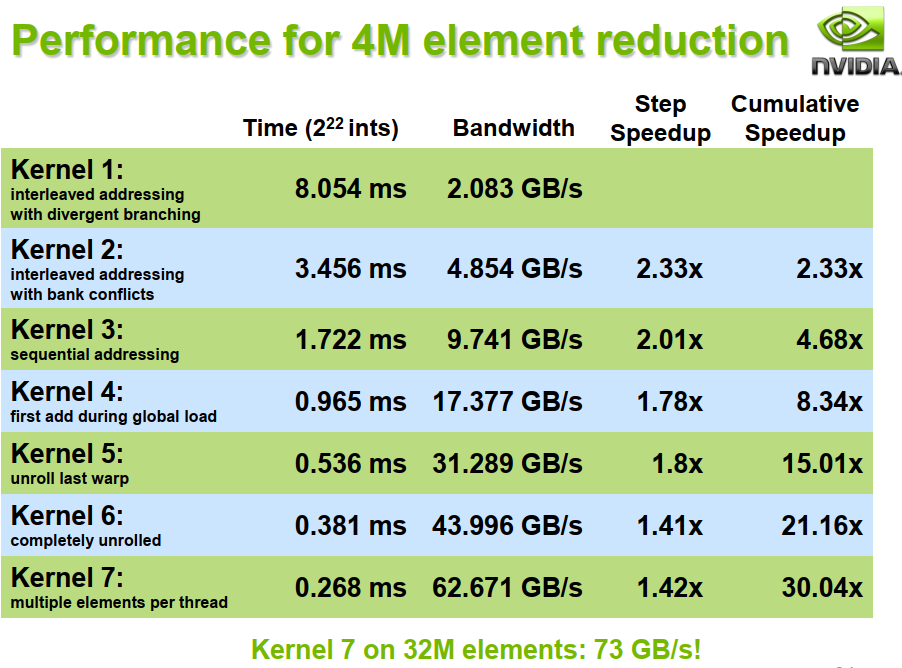
具体问题:将长数组的所有元素,归约求和为一个结果。[^1][^2]

总体思路

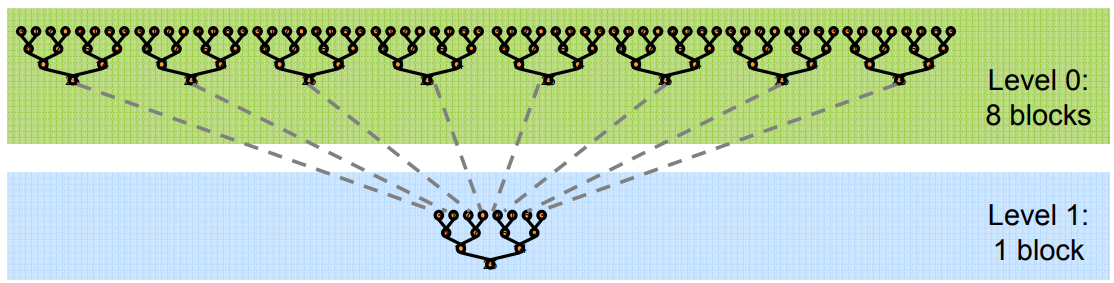
为了避免全局同步的巨大开销,采取分级归约

由于归约的计算密度低
1 flop per element loaded (bandwidth-optimal)

所以优化目标是将访存带宽用满。

1
2
384-bit memory interface, 900 MHz DDR
384 * 1800 / 8 = 86.4 GB/s

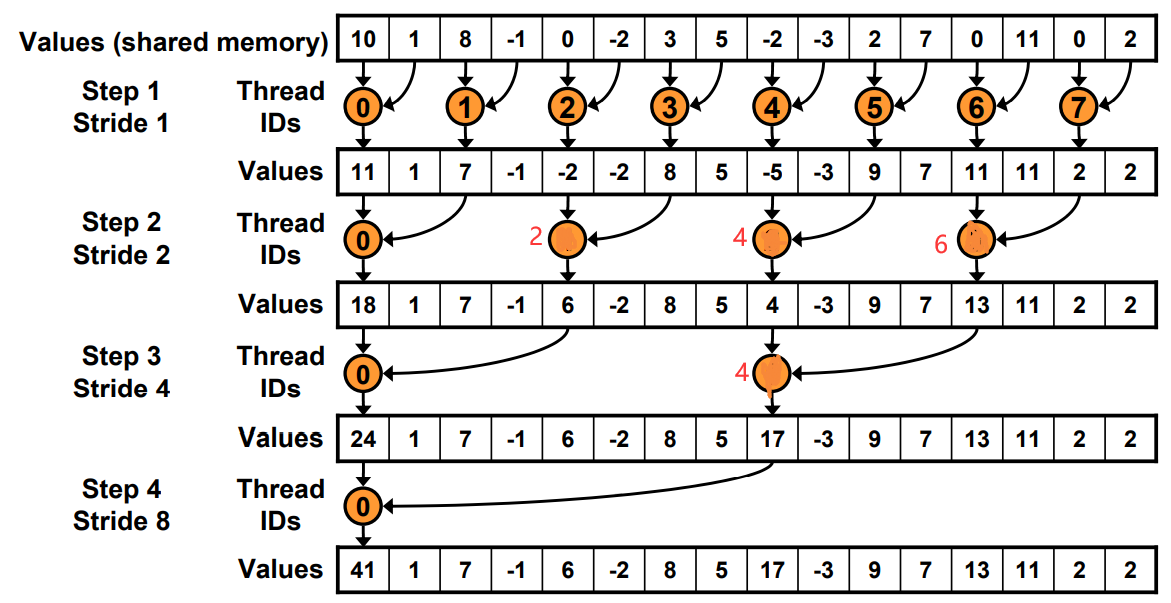
step0 : baseline - Interleaved Addressing 交错/间隔寻址

1
2
3
4
5
6
7
8
9
10
11
12
13
14
15
16
17
18
19
20
__global__ void reduce0(int *g_idata, int *g_odata) {
extern __shared__ int sdata[];

// each thread loads one element from global to shared mem
unsigned int tid = threadIdx.x;
unsigned int i = blockIdx.x*blockDim.x + threadIdx.x;
sdata[tid] = g_idata[i];
__syncthreads();

// do reduction in shared mem
for(unsigned int s=1; s < blockDim.x; s *= 2) {
if (tid % (s) == 0) {
sdata[tid] += sdata[tid + s];
}
__syncthreads();
}

// write result for this block to global mem
if (tid == 0) g_odata[blockIdx.x] = sdata[0];
}


工作的线程越来越少。一开始是全部,最后一次只有thread0.

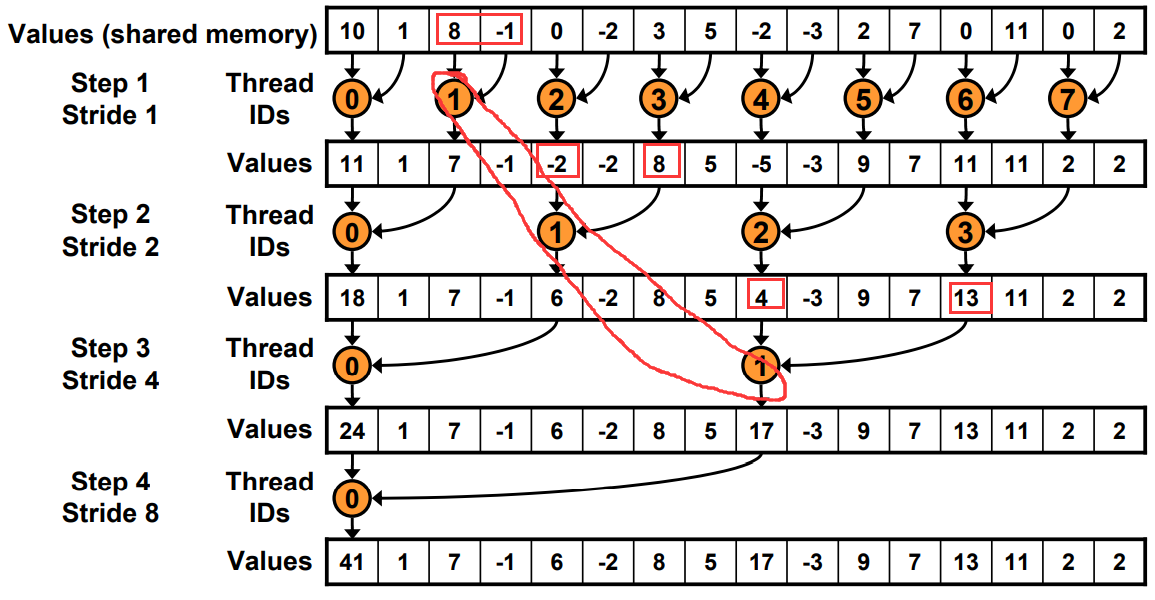
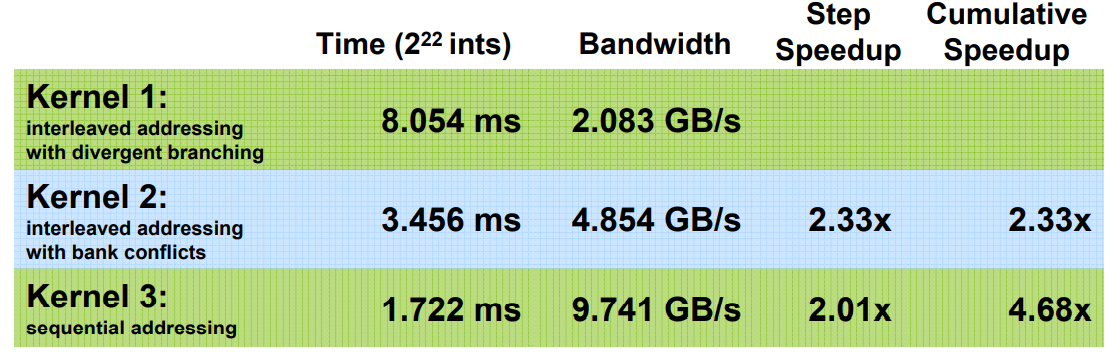
Step1 : 使用连续的index

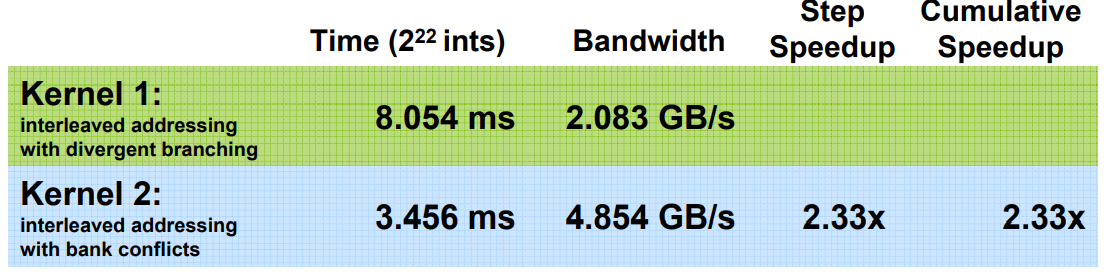
Just replace divergent branch With strided index and non-divergent branch,但是会带来bank conflict。

原理和Warp发射有关,假如在这里每个Warp并行的线程是2。一个Warp运行耗时为T.

Step0: 4+4+2+1=11T

Step1: 4+2+1+1=8T

1
2
3
4
5
6
7
for (unsigned int s=1; s < blockDim.x; s *= 2) {
int index = 2 * s * tid;
if (index < blockDim.x) {
sdata[index] += sdata[index + s];
}
__syncthreads();
}


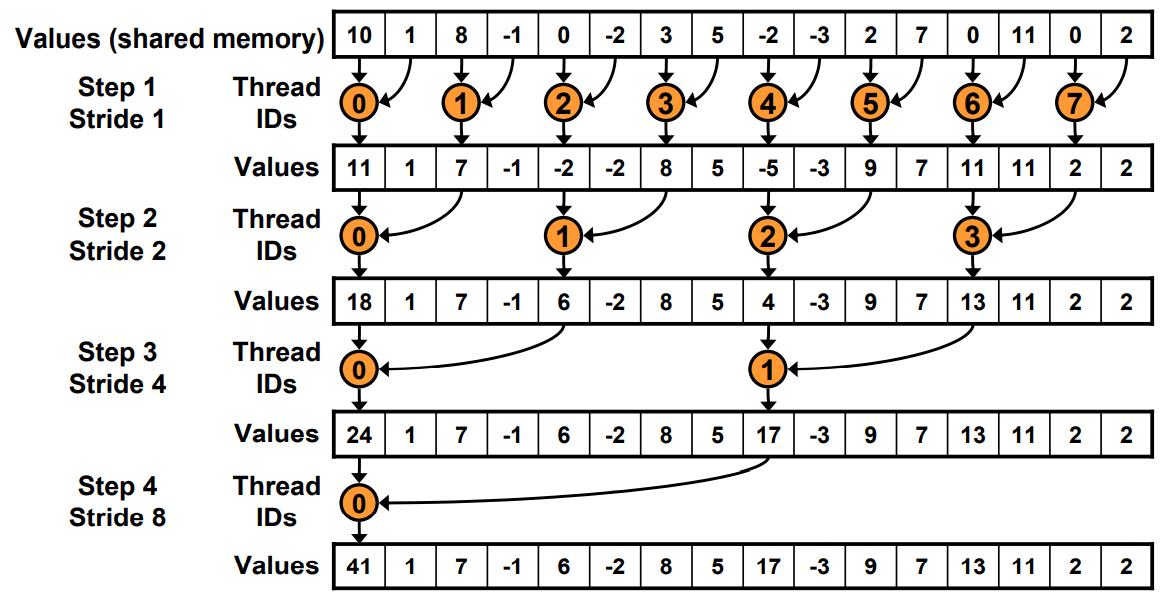
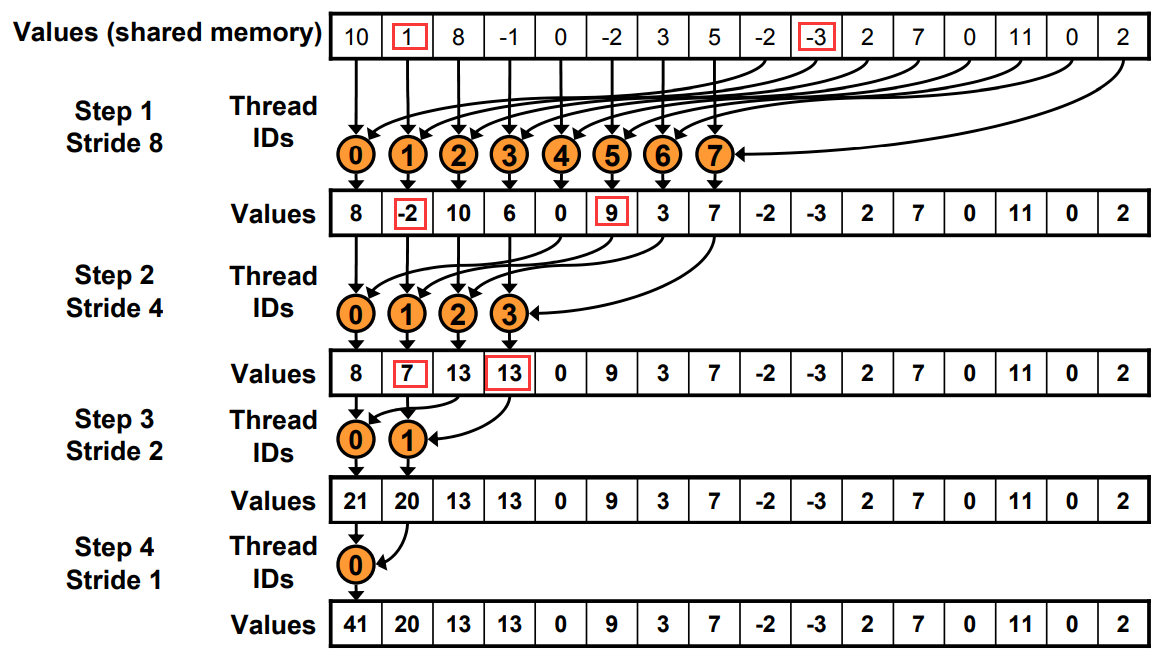
Step2: 连续寻址

1
2
3
4
5
6
for (unsigned int s=blockDim.x/2; s>0; s>>=1) {
if (tid < s) {
sdata[tid] += sdata[tid + s];
}
__syncthreads();
}

原本寻址

现在寻址有一边连续了

Step3 : 弥补浪费的线程

方法: 在load SMEM的时候提前做一次规约加法,通过减少一半的block数,将原本两个block里的值load+add存储在sum里。

1
2
3
4
5
6
// perform first level of reduction,
// reading from global memory, writing to shared memory
unsigned int tid = threadIdx.x;
unsigned int i = blockIdx.x*(blockDim.x*2) + threadIdx.x;
sdata[tid] = g_idata[i] + g_idata[i+blockDim.x];
__syncthreads();

step4 : Unrolling the Last Warp

当s< 32的时候,就只有一个Warp工作了。

使用warp的SIMD还省去了__syncthreads()的麻烦

1
2
3
4
5
6
7
8
9
10
11
12
13
14
15
for (unsigned int s=blockDim.x/2; s>32; s>>=1) 
{
if (tid < s)
sdata[tid] += sdata[tid + s];
__syncthreads();
}
if (tid < 32)
{
sdata[tid] += sdata[tid + 32];
sdata[tid] += sdata[tid + 16];
sdata[tid] += sdata[tid + 8];
sdata[tid] += sdata[tid + 4];
sdata[tid] += sdata[tid + 2];
sdata[tid] += sdata[tid + 1];
}

为了保持整洁,最后一个if还做了无效的计算。eg, Warp里的最后一个线程只有第一句命令有用。

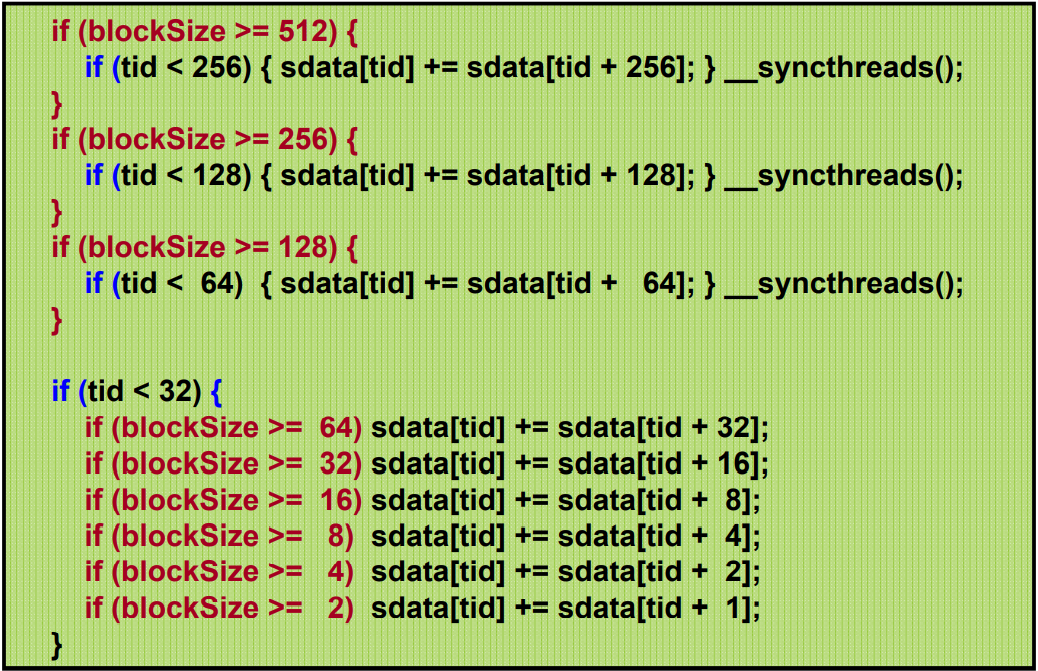
Step5 : 根据blockSize完全展开for和去除代码

由于for循环里是二分的,而且小于32的单独处理了,导致for循环里实际运行代码最多就3句。

利用代码模板和编译器的自动优化实现:

1
2
template <unsigned int blockSize>
__global__ void reduce5(int *g_idata, int *g_odata)

红色代码会在编译时自动优化。

step6 :归并算法优化

加速级联??

Cost= processors × time complexity

我们知道N个元素直接二叉树归约是O(log N)
时间 Cost=N*O(log N).

但是假如只有P个线程先做N/P的串行加法, 然后是log(P)的归约。
总cost=P(N/P+log(P))

当P=N/log(N), cost=O(N)

each thread should sum O(log n) elements来设置

比如,1024 or 2048 elements per block vs. 256 线程。每个sum n=4个元素。 具体参数要perf

1
2
3
4
5
6
7
8
9
unsigned int tid = threadIdx.x;
unsigned int i = blockIdx.x*(blockSize*2) + threadIdx.x;
unsigned int gridSize = blockSize*2*gridDim.x;
sdata[tid] = 0;
while (i < n) {
sdata[tid] += g_idata[i] + g_idata[i+blockSize];
i += gridSize;
}
__syncthreads();

final code

1
2
3
4
5
6
7
8
9
10
11
12
13
14
15
16
17
18
19
20
21
22
23
24
25
26
27
template <unsigned int blockSize>
__global__ void reduce6(int *g_idata, int *g_odata, unsigned int n)
{
extern __shared__ int sdata[];

unsigned int tid = threadIdx.x;
unsigned int i = blockIdx.x*(blockSize*2) + tid;
unsigned int gridSize = blockSize*2*gridDim.x;
sdata[tid] = 0;

do { sdata[tid] += g_idata[i] + g_idata[i+blockSize]; i += gridSize; } while (i < n);
__syncthreads();

if (blockSize >= 512) { if (tid < 256) { sdata[tid] += sdata[tid + 256]; } __syncthreads(); }
if (blockSize >= 256) { if (tid < 128) { sdata[tid] += sdata[tid + 128]; } __syncthreads(); }
if (blockSize >= 128) { if (tid < 64) { sdata[tid] += sdata[tid + 64]; } __syncthreads(); }

if (tid < 32) {
if (blockSize >= 64) sdata[tid] += sdata[tid + 32];
if (blockSize >= 32) sdata[tid] += sdata[tid + 16];
if (blockSize >= 16) sdata[tid] += sdata[tid + 8];
if (blockSize >= 8) sdata[tid] += sdata[tid + 4];
if (blockSize >= 4) sdata[tid] += sdata[tid + 2];
if (blockSize >= 2) sdata[tid] += sdata[tid + 1];
}
if (tid == 0) g_odata[blockIdx.x] = sdata[0];
}

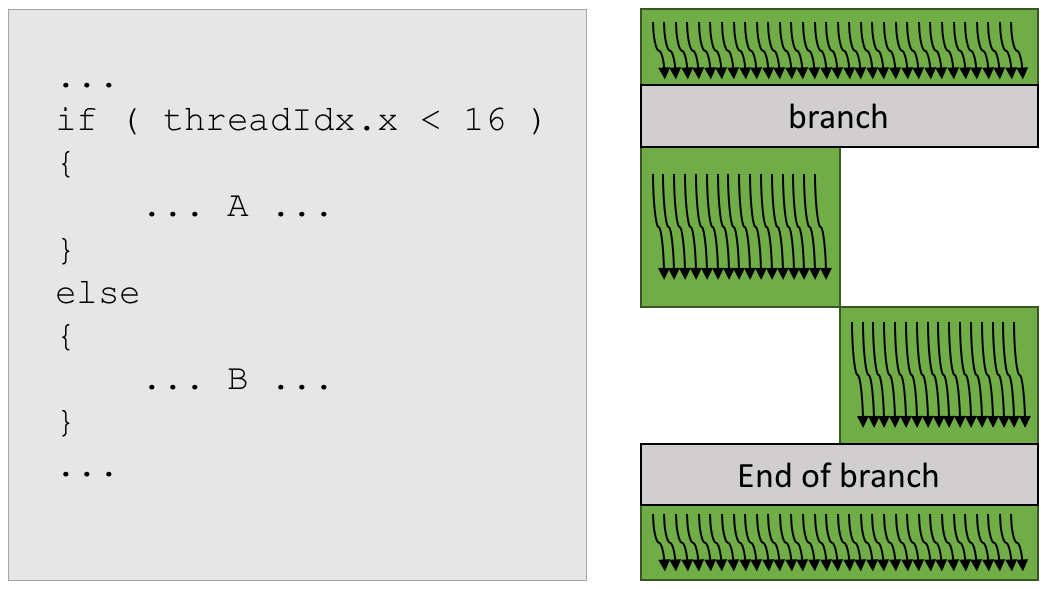
关于if语句的补充

有if语句是没问题的,只要运行的时候全部执行if或者else就行。不要有些执行if,有些执行else,这才会等待。

说不定也不是全部执行if或者else就行,只需要连续32个Thread Index,是相同的执行就行。(猜想,需要测试。

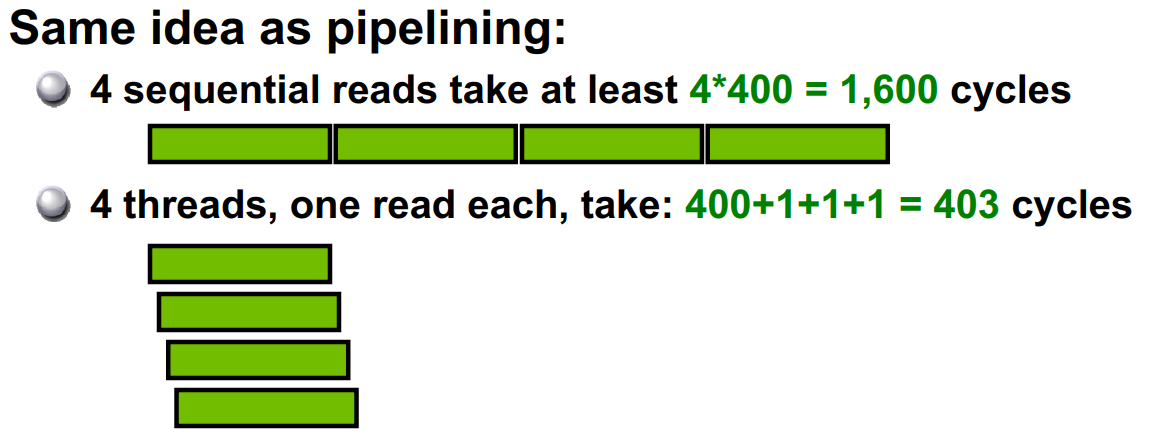
关于延迟隐藏

通过增加block里的线程数,并且同时读取来隐藏延迟。 不仅可以隐藏Global Memory的延迟,还可以隐藏写后读的延迟

线程资源查看

线程太多会导致分配到每一个的寄存器和SMEM变少

通过编译时加-cubin选项,.cubin文件前几行会显示

1
2
3
4
5
6
7
8
architecture {sm_10}
abiversion {0}
modname {cubin}
code {
name = BlackScholesGPU
lmem = 0 # per thread local memory
smem = 68 # per thread block shared memory
reg = 20 # per thread registers

参考文献

[^1]: SC07 Optimizing Parallel Reduction in CUDA - Mark Harris

[^2]: 2009 清华 邓仰东 cuda lecture pdf 注意也是参考的SC07 Nvidia。

Nvprof

安装

1
2
$ which nvprof 
/usr/local/cuda/bin/nvprof

基本使用

摘要模式

命令行直接运行

1
nvprof ./myApp

跟踪API

1
nvprof --print-gpu-trace ./myApp

保存在log里

1
sudo /usr/local/cuda/bin/nvprof --log-file a.log --metrics achieved_occupancy /staff/shaojiemike/github/cutests/22-commonstencil/common

可视化

  1. nsight可以直接在远程机器上运行
    1. ssh -X host
    2. .ssh/config
      1. add
      2. XAuthLocation /opt/X11/bin/xauth #for macbookAir
      3. ForwardX11Trusted yes
      4. ForwardX11 yes
  2. Visual Profiler也可以ssh直接连接远程机器
  3. 或者导出分析结果以便可视化, 在Visual Profiler使用
1
2
nvprof --export-profile timeline.prof <app> <app args>
nvprof --analysis-metrics -o nbody-analysis.nvprof ./myApp

profile kernel

1
sudo /usr/local/cuda/bin/ncu -k stencil_kernel -s 0 -c 1 /staff/shaojiemike/github/cutests/22-commonstencil/best

ncu-ui是可视化界面,但是没弄懂

带宽profile

上限测量

1
# shaojiemike @ snode0 in ~/github/cuda-samples-11.0 [16:02:08]                                                                                                                                                                      $ ./bin/x86_64/linux/release/bandwidthTest                                                                                                                                                                                           [CUDA Bandwidth Test] - Starting...                                                                                                                                                                                                  Running on...                                                                                                                                                                                                                                                                                                                                                                                                                                                              Device 0: Tesla P40                                                                                                                                                                                                                  Quick Mode                                                                                                                                                                                                                                                                                                                                                                                                                                                                Host to Device Bandwidth, 1 Device(s)                                                                                                                                                                                                PINNED Memory Transfers                                                                                                                                                                                                                Transfer Size (Bytes)        Bandwidth(GB/s)                                                                                                                                                                                         32000000                     11.8                                                                                                                                                                                                                                                                                                                                                                                                                                       Device to Host Bandwidth, 1 Device(s)                                                                                                                                                                                                PINNED Memory Transfers                                                                                                                                                                                                                Transfer Size (Bytes)        Bandwidth(GB/s)                                                                                                                                                                                         32000000                     13.0                                                                                                                                                                                                                                                                                                                                                                                                                                       Device to Device Bandwidth, 1 Device(s)                                                                                                                                                                                              PINNED Memory Transfers                                                                                                                                                                                                                Transfer Size (Bytes)        Bandwidth(GB/s)                                                                                                                                                                                         32000000                     244.3                                                                                                                                                                                                                                                                                                                                                                                                                                     Result = PASS                                                                                                                                                                                                                                                                                                                                                                                                                                                             NOTE: The CUDA Samples are not meant for performance measurements. Results may vary when GPU Boost is enabled.                                                                                                                                                                                       # shaojiemike @ snode0 in ~/github/cuda-samples-11.0 [16:03:24]                                                                                                                                                                      $ ./bin/x86_64/linux/release/p2pBandwidthLatencyTest        

实际值

nvprof通过指定与dram,L1或者L2 的metrics来实现。具体解释可以参考官网

在 Maxwell 和之后的架构中 L1 和 SMEM 合并

Metric Name 解释
achieved_occupancy 活跃cycle是 Warps 活跃的比例
dram_read_throughput
dram_utilization 在0到10的范围内,相对于峰值利用率,设备内存的利用率水平
shared_load_throughput
shared_utilization
l2_utilization

需要进一步的研究学习

暂无

遇到的问题

暂无

开题缘由、总结、反思、吐槽~~

参考文献

Hugo

  1. Hugo is a Go-based static site generator known for its speed and flexibility in 2013.
  2. Hugo has set itself apart by being fast. More precisely, it has set itself apart by being much faster than Jekyll.
  3. Jekyll uses Liquid as its templating language. Hugo uses Go templating. Most people seem to agree that it is a little bit easier to learn Jekyll’s syntax than Hugo’s.^1
Read more

Servers

通过IPMI芯片的静态IP远程重启和配置机器

https://cloud.tencent.com/developer/article/1448642

Group

当前组

1
2
shaojiemike@snode6:~$ groups shaojiemike
shaojiemike : staff sudo

所有组

1
cat /etc/group

User

whoami

一般用户位置

/etc/passwd

LDAP教程

如果发现自己不在/etc/passwd里,很可能使用了ldap 集中身份认证。可以在多台机器上实现分布式账号登录,用同一个账号。

1
getent passwd 

first reboot server

1
2
3
4
5
6
7
ctrl + alt + F3     #jump into command line
login
su - {user-name}
sudo -s
sudo -i
# If invoked without a user name, su defaults to becoming the superuser
ip a |less #check ip address fjw弄了静态IP就没这个问题了

限制当前shell用户爆内存

宕机一般是爆内存,进程分配肯定会注意不超过物理核个数。

在zshrc里写入 25*1024*1024 = 25GB的内存上限

1
ulimit -v 26214400

当前shell程序超内存,会输出Memory Error结束。

测试读取200GB大文件到内存

1
2
3
with open("/home/shaojiemike/test/DynamoRIO/OpenBLASRawAssembly/openblas_utest.log", 'r') as f:
data= f.readlines()
print(len(data))
有文章说Linux有些版本内核会失效