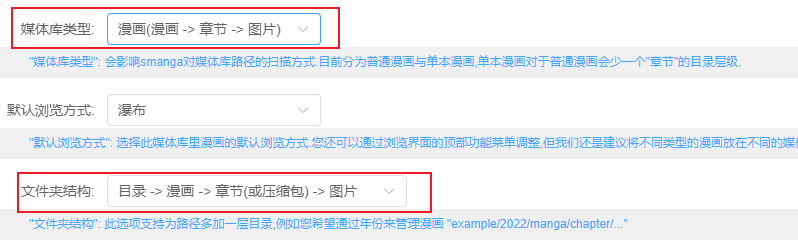
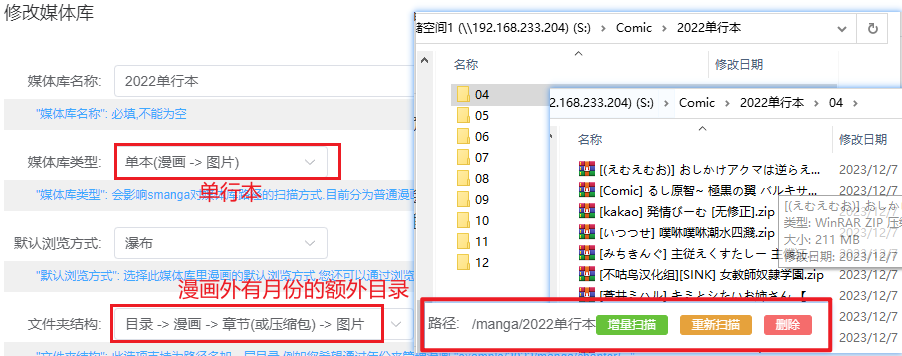
漫画或者PDF的jellyfin版本 , 类似的还有 基于docker的smanga
Rather than browse rouman online, high-resolution pivix pictures seems more worthy to be downloaded and maintained.
But first you need a much bigger NAS.
image run创建容器。data/1 and data/2。 and Please think carefully because restart container will triger the following bugs:
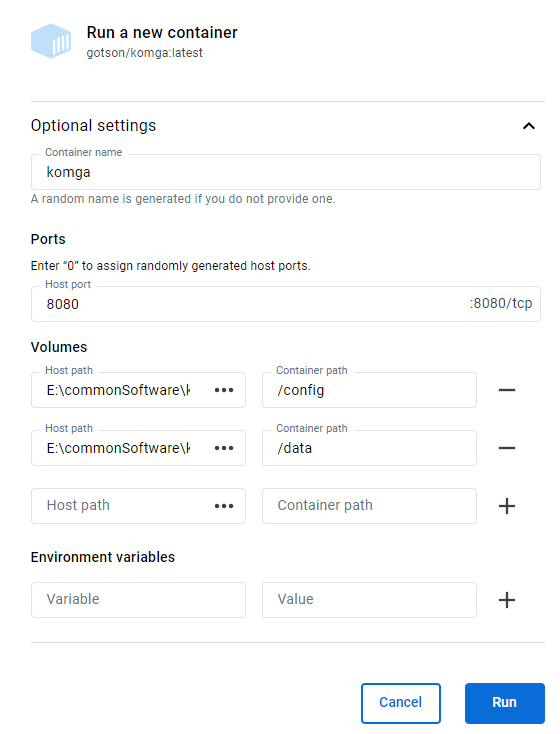
But docker on Windows remains many bugs:
In http://brainiac.acsalab.com:2333/
sudo mount.cifs //synology.acsalab.com/Entertainment /synology -o user=xxx vers=3.0采取第一种, 在 portainer.io的local的stack里使用docker compose部署
1 | --- |
komga image需要图书/漫画刮削
| dockers | komga | smanga | Kavita |
|---|---|---|---|
| 单一大PDF文件加载 | 缓慢 | 缓慢 | |
| 格式支持 | zip,cbz,pdf | 部分zip不支持bug,不支持cbz | zip,pdf ,cbz |
| 如何支持单文件夹多图片 | 每个文件夹单独压缩成zip反而支持 | :material-close: | |
| 自定义元数据 | :material-close: | :material-check: | :material-check: |
| 任意位置标签 | :material-close: | :material-check: | :material-check: |
| 已知bug | 容器会自动关机(有待进一步测试) | ||
| 总体评价 | 基础完善稳定,但是定制化不足 | 有用的定制化 | 全,但是不维持原目录有点恶心,导致必须按照类型整理。 |
1 | Library Root |
Series Name的新文件(e.g.,abc.cbz),当作新的作品单独列出在根目录。这十分傻逼,对内容的共振度的要求也太高了。出现一个命名不规范的文件就会乱套。可以看得出作者有特殊的设计。

但是美中不足的是对于子文件夹的支持不够,太深的文件读取不到。

理论如此,但是实际貌似会卡住。
Komga支持CBZ/CBR、EPUB、PDF格式。对于漫画而言,个人觉得cbz1是最简单、兼容性最高的格式。
建议的文件结构如下:
1 | . |
libraryManga表示库名,下一层结构区分不同的漫画,更下一层则存储漫画文件内容的组织考虑的是一个平衡,每个lib下应该只有40个左右的内容。
下载的内容的特点:
合集/A/PDF/*看多少,刮削多少。
见 Calibre and its Pugins for e-hentai Books 一文
cbl,配置好后在目录下运行python processMetadata.py,即可近乎完美的给漫画加上海报和信息了尝试后发现是,类似RSS的漫画网页集成浏览器(B站,腾讯漫画,18+漫画)。实现订阅,跟踪,一键下载。 由于生态很不错,不用担心订阅链接失效。
我猜测是内存不够
暂无
暂无
| 命令 | 描述 |
|---|---|
next |
单步执行 |
step |
单步进入 |
finish or fin |
跳出当前函数 |
continue |
继续执行到下一个断点 |
until |
继续运行到指定位置 |
finish: Continue running until just after function in the selected stack frame returns. Print the returned value (if any).gdb --args 正常程序+参数set args 参数f 打印当前文件 ,便于打断点info breakpoints 查看已经的断点del 3 删除NUM=3的第三个断点给某个结构体内的函数全部上break
1 | rbreak file.cpp:.*TemplateClass.* |
show argsinfo localsp result=20btinfo threadsthread 2thread apply all bt1 | list # 代码,需要-g |
1 | gef➤ p -raw-values off -- this->TotalCycles |
p **matrix@3@3p *matrix@3p *(int *)matrix@3p *(int (*)[3])matrix1 | (gdb) p array[60]@10 |
可以看到打印了array数组第60~69个元素的值。如果要打印从数组开头连续元素的值,也可使用这个命令:“p *array@num”:
1 | (gdb) p *array@10 |
格式:x /nfu <addr>
说明:
x 是 examine 的缩写。n 表示要显示的内存单元的个数。f 表示显示方式,可取如下值:| 显示方式 | 描述 |
|---|---|
x |
按十六进制格式显示变量。 |
d |
按十进制格式显示变量。 |
u |
按无符号整型格式显示变量。 |
o |
按八进制格式显示变量。 |
t |
按二进制格式显示变量。 |
a |
按十六进制格式显示变量。 |
i |
指令地址格式。 |
c |
按字符格式显示变量。 |
f |
按浮点数格式显示变量。 |
u 表示一个地址单元的长度,长度类型如下:| 类型 | 描述 |
|---|---|
b |
单字节 |
h |
双字节 |
w |
四字节 |
g |
八字节 |
example:
1 | (gdb) x 0x8049948 |
1 | layout split |
段错误定位
1 | # ulimit -c 显示核心转储文件大小的最大值 |
1 | gdb SLIC core.199048 |
1 | (gdb) bt |
会打印详细的信息


需要GDB10以上
1 | bash -c "$(curl -fsSL http://gef.blah.cat/sh)" |
注意:gdbtui 与 gef 不太兼容
Script: Email notifications when machine is free
login to free SMTP server(qq, google) to send email to others.
ping mail.ustc.edu.cnAccording to ref1.
1 | # install ca-certificates |
1 | sudo apt-get install mailutils |
send but the same, more crazy thing is the -v and -d flag is not supported. and --debug-level=trace0 isn’t recognized. many same question in StackOverflow
sudo tail -n 30 /var/log/mail.log or mail.error show more info.
We try ref2 ssmtp, sudo vim /etc/ssmtp/ssmtp.conf
1 | TLS_CA_FILE=/etc/pki/tls/certs/ca-bundle.crt |
The config get work but not well configed, e.g., TLS_CA_FILE
sending a email using gmail took about 13 mins.
1 | $ ssmtp 943648187@qq.com < mail.txt |
1 | $ sendmail 94364818s7@qq.com < mail.txt |
get to work after well config gmail setting.
| command | snode6 time(mins) | icarus1 |
|---|---|---|
| 4 | 1s | |
| ssmtp | 13 | |
| sendmail | 6 |
ref using QQ apppassword and python.
Create a Bash Script: Create a Bash script that checks the CPU usage and sends an email if it’s below 30%. For example, create a file named cpu_check.sh:
1 |
|
Make the script executable:
1 | chmod +x cpu_check.sh |
Modify your_email@example.com with your actual email address.
Schedule the Script: Use the cron scheduler to run the script at regular intervals. Edit your crontab by running:
1 | crontab -e |
Add an entry to run the script, for example, every 5 minutes:
1 | */5 * * * * /staff/shaojiemike/test/cpu_check.sh >> /staff/shaojiemike/test/cpu_check.log |
Replace /path/to/cpu_check.sh with the actual path to your Bash script.
Save and Exit: Save the crontab file and exit the text editor.
Now, the script will run every 5 minutes (adjust the cron schedule as needed) and send an email notification if the CPU usage is below 50%. You should receive an email when the condition is met.
Please note that this is a basic example, and you can modify the script to include more details or customize the notification further as needed. Additionally, ensure that your server is configured to send emails; you may need to configure SMTP settings for the mail or sendmail command to work correctly.
暂无
暂无
上面回答部分来自ChatGPT-3.5,没有进行正确性的交叉校验。
无
zsim-tlb simulate in icarus0
1 | pinbin: build/opt/zsim.cpp:816: LEVEL_BASE::VOID VdsoCallPoint(LEVEL_VM::THREADID): Assertion `vdsoPatchData[tid].level' failed. |
1 | VOID VdsoCallPoint(THREADID tid) { |
vDSO (virtual dynamic shared object) is a kernel machanism for exporting a carefully set kernel space routines (eg. not secret api, gettid() and gettimeofday()) to uservDSO__vdso_getcpu() C library, and kernel will auto move it to user-spacevDSO overcome vsyscall(first linux-kernel machanism to accelerate syscall) drawback.vDSO have only four function enum VdsoFunc {VF_CLOCK_GETTIME, VF_GETTIMEOFDAY, VF_TIME, VF_GETCPU};1 | // Instrumentation function, called for EVERY instruction |
INS_Address is from pin-kit, but INS_InsertCall is pin api.
.level is just show the level of nested vsyscall. I think comment the assert which trigerd when callfunc before entryfunc is just fun.
暂无
暂无
上面回答部分来自ChatGPT-3.5,没有进行正确性的交叉校验。
无
Anaconda和Miniconda都是针对数据科学和机器学习领域的Python发行版本,它们包含了许多常用的数据科学包和工具,使得安装和管理这些包变得更加简单。
解决了几个痛点:
Anaconda是一个全功能的Python发行版本,由Anaconda, Inc.(前称Continuum Analytics)提供。
Miniconda是Anaconda的轻量级版本(50MB),它也由Anaconda, Inc.提供。
修改~/.condarc
1 | ssl_verify: true |
1 | # 激活环境(base),路径为指定的 conda 安装路径下的 `bin/activate` 文件 |
conda packconda pack 用于将现有的 Conda 环境打包成一个压缩文件(如 .tar.gz),便于在其他系统上分发和安装。conda-unpack 来修复路径,使其在新环境中正常工作。conda-pack 可以将 Conda 环境打包成一个 .tar.gz 文件,以便于跨机器或系统移动和还原环境。以下是使用 conda-pack 打包和还原环境的步骤:
假设要打包的环境名为 my_env:
1 | conda pack -n my_env -o my_env.tar.gz |
这会在当前目录生成一个 my_env.tar.gz 文件。你可以将这个文件复制到其他系统或机器上解压还原。
在一个特定的 conda 环境目录(例如 /home/anaconda3)下还原和激活打包的环境,可以按以下步骤操作:
假设场景
conda 激活路径:/home/anaconda3/bin/activatemy_env.tar.gzmy_env步骤
解压文件到 conda 环境目录
首先,将打包文件解压到指定的 conda 环境目录下的 envs 目录:
1 | mkdir -p /home/anaconda3/envs/my_env |
这里的 --strip-components 1 会去掉 tar.gz 包中的顶层目录结构,使内容直接解压到 my_env 文件夹内。
激活并修复环境
激活该环境,并运行 conda-unpack 来修复路径:
1 | source /home/anaconda3/bin/activate /home/anaconda3/envs/my_env |
现在,my_env 环境已在 /home/anaconda3 目录下的 envs 文件夹中完成还原,可以正常使用。
conda env exportconda env export > freeze.yml 用于导出当前 Conda 环境的配置,包括所有安装的包和它们的版本信息,以 YAML 格式保存。conda env create -f freeze.yml 可以根据导出的 YAML 文件创建一个新环境。在conda命令无效时使用pip命令来代替
1 | while read requirement; do conda install --yes $requirement || pip install $requirement; done < requirements.txt |
The double pipe (“||”) is a control operator that represents the logical OR operation. It is used to execute a command or series of commands only if the previous command or pipeline has failed or has returned a non-zero status code.
conda create -n 新环境名称 --clone 原环境名称 --copy
在任意层级的SHELL配置文件里添加
1 | export http_proxy=http://yourproxy:port |
1 | ps -eo pid,lstart,cmd |grep bhive |
1 | sudo ps -ef | grep 'bhive-re' | grep -v grep | awk '{print $2}' | sudo xargs -r kill -9 |
timedatectl 是一个管理日期和时间的工具,可以用来永久设置系统时间和时区。
1 | sudo timedatectl set-time "2024-10-26 19:12:19" |
如果发现时区也不正确,可以用下面的命令设置时区:
1 | sudo timedatectl set-timezone "Asia/Shanghai" |
例如,将时区设置为中国标准时间 (CST, UTC+8),时区名称需要使用 timedatectl list-timezones 查看可用的时区列表。
1 | df -h . |
deep为1
1 | du -h -d . |
1 | # thi |
ps aux linux command whill show no zero cpu usage when the process is sleeping beacuse of its snapshots mechanism
1 | dpkg: 处理归档 /var/cache/apt/archives/bat_0.12.1-1build1_arm64.deb (--unpack)时出错: |
1 | sudo apt-get purge -h |
tree -L DepthSIze Folder_Path
1 | #分析symbols |
综合来看,使用 nm -gDC <filename> 命令可以查看一个二进制可执行文件或者共享库中的全局符号表和动态符号表,并将包含其中的 C++ 符号名还原成源代码中的名称。
1 | shaojiemike@snode6 ~/github/gem5 [10:49:56] |